Diagnosing Leaks and Selecting the Right Exhaust Pipe Repair Flange
An exhaust pipe repair flange is a weld-free mechanical repair component that clamps behind the existing flared lip of an exhaust pipe to replace rotted, cracked, or broken factory flange ears. It restores a rigid clamping surface so the joint can be bolted tight again without cutting or welding the exhaust system. Once the leak is confirmed, you can select a split flange kit or a clamp-style sleeve based on the condition of the pipe and mounting ears.
Before picking up any wrenches, you must pinpoint the exact failure point along the exhaust tract. Exhaust leaks disguise themselves in various ways: a distinct rhythmic ticking noise during cold starts, a heavy cabin vibration under acceleration, or a deep, unwanted rumble that makes a daily commute sound like an open-header drag car. In industrial piping and automotive exhaust systems alike, addressing why flanges leak begins with systematic diagnostic steps.
- Acoustic and Visual Inspection: Raise and safely secure the vehicle on jack stands. Inspect every connection point starting from the catalytic converter back to the muffler. Look for black, powdery carbon soot marks streaking across the flange face or along the tubing weld seams.
- Mechanic’s Stethoscope: With the vehicle idling, trace along the exhaust joint using a mechanic’s stethoscope fitted with an open metal probe (or a length of clean vacuum hose). Hold the open end roughly an inch away from the flange periphery. The sudden rushing hiss or loud pop marks the precise breach point.
- Soapy Water Spray Test: On a completely stone-cold engine, connect a shop vac in reverse (blower mode) to the tailpipe and seal the opening with a rag. Spray a mixture of dish soap and water around the flange faces, bolt holes, and welds. Escaping air will rapidly produce visible bubbling at the leak source without any heat hazard.
Once the breach is identified, you must determine whether you need a replacement gasket, a standard flat bolt-on repair kit, or a clamp-style sleeve.
| Repair Solution | Best Suited For | Installation Method | Key Dimensional Features | Hardware Included |
|---|---|---|---|---|
| 2-Bolt Flat Split Flange Kit | Rusted, thinned, or cracked mounting ears where the inner pipe flare remains solid | Clamps directly over the existing pipe flare behind the failed flange; bolts to opposing flange | Slotted bolt patterns (typically fitting 3″ to 4″ centers); plate thickness of 5/16″ (.3125″) | Heavy-duty Grade 8 or metric equivalent bolts, lock washers, and high-temp nuts |
| Clamp-Style Sleeve Repair Kit | Severed pipes, rusted-through weld necks, or completely rotten flange collars | Slides over cut pipe ends and locks down mechanically without welding | Accommodates straight tubing (e.g., 2.00″ ID, 2.125″ OD, or 2.25″ to 2.50″ sizing) | High-strength band or U-bolt exhaust clamps with integrated sealing collars |
| Direct-Fit Stud Bracket Kit | Broken manifold or converter flange studs with solid mounting ears | Brackets slip over broken studs and secure through existing holes | Specific stud lengths (e.g., 45.23 mm) and standard threads (e.g., M10-1.50) | Contoured stainless steel brackets and hex nuts |
Measuring Pipe Diameter for an Exhaust Pipe Repair Flange
Selecting an exhaust pipe repair flange requires accurate physical measurements rather than guessing by eye. Automotive exhaust tubing is designated by outside diameter (OD) and inside diameter (ID), and even a sixteenth of an inch error can cause loose clamping or exhaust blow-by.
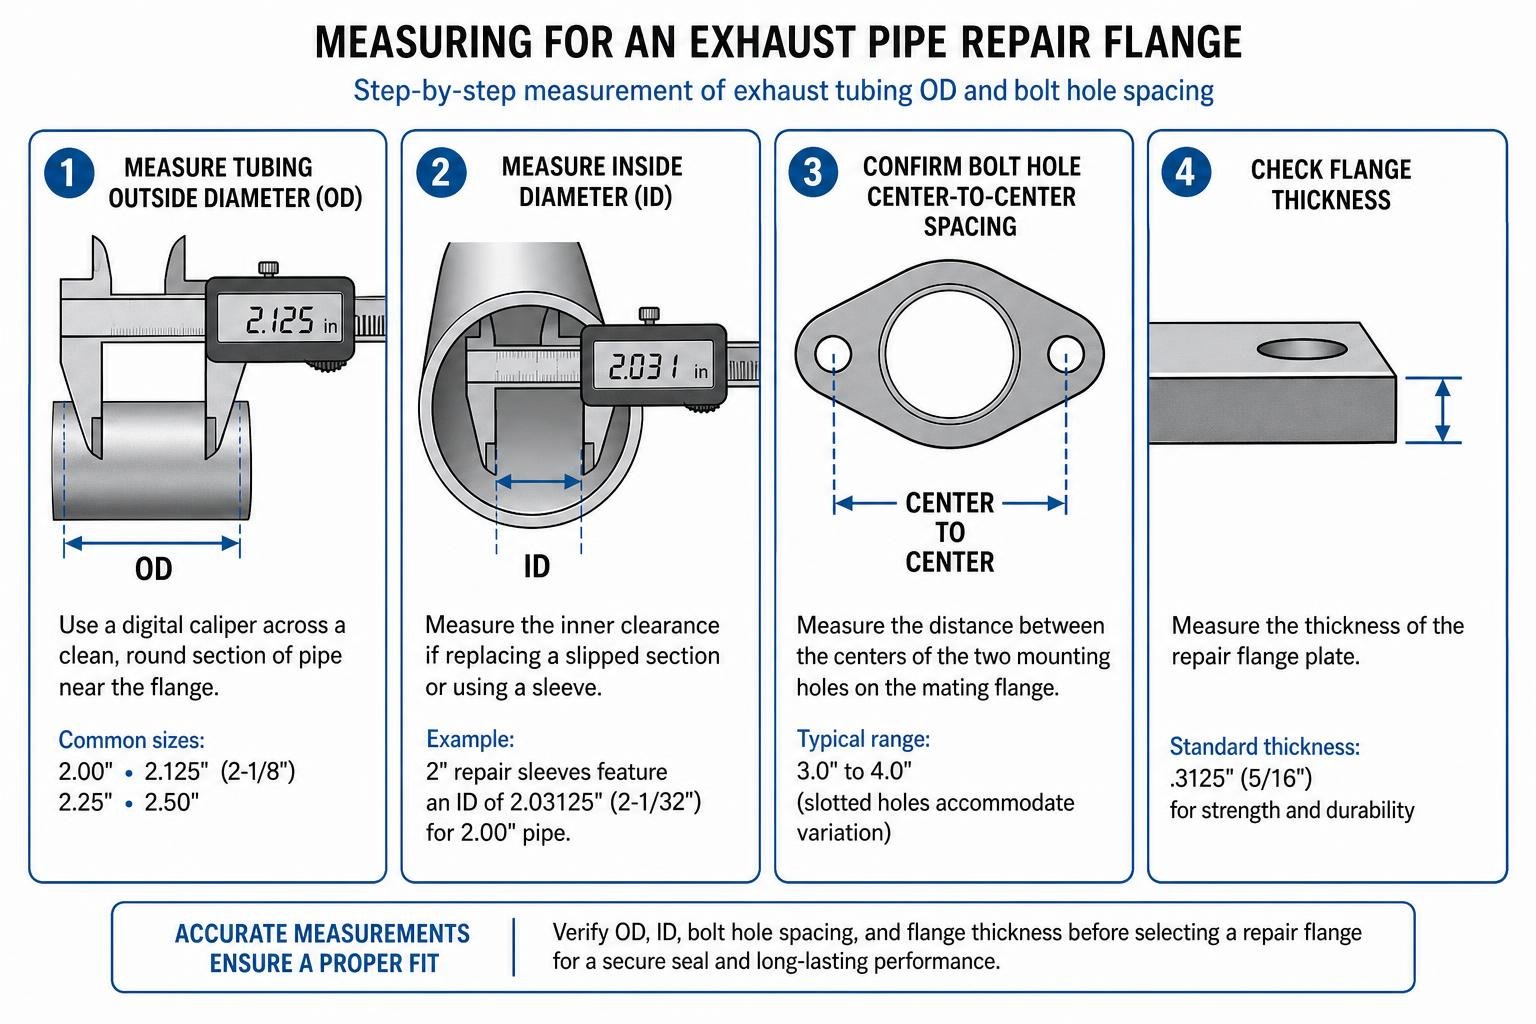
- Measure Tubing Outside Diameter (OD): Use a precision digital caliper across a clean, round section of pipe immediately adjacent to the damaged flange. Common exhaust tubing sizes include 2.00″, 2.125″ (2-1/8″), 2.25″, and 2.50″.
- Measure Inside Diameter (ID): If replacing a slipped section, confirm the inner clearance. For example, standard 2-inch repair sleeves feature an ID of 2.03125″ (2-1/32″) designed to slip snugly over 2.00″ pipe.
- Confirm Bolt Hole Center-to-Center Spacing: Measure the distance between the centers of the two mounting holes on the mating flange. Many universal repair kits feature slotted ear channels to accommodate spacing ranging from 3.0″ to 4.0″.
- Check Flange Thickness: Heavy-duty repair plates typically utilize a .3125″ (5/16″) carbon steel or stainless plate to resist warping under high clamping torque.
Split Flange vs. 2-Bolt Clamp-Style Kits
When the factory flange welds rot out or the mounting ears snap off under tension, you do not need to replace the entire catalytic converter or muffler assembly.
A split flange kit consists of two interlocking or overlapping heavy-gauge steel halves that fit behind the flared lip of the exhaust pipe. This setup provides a brand-new, rigid mechanical backing without requiring you to cut the pipe or slide a solid ring over a bent exhaust hanger.
Conversely, a clamp-style sleeve repair kit is necessary when the metal pipe itself has rusted through directly at the weld seam. These kits feature an extended tubing neck (often with an assembled length of 6 inches) that bridges the severed gap and clamps down securely.
When long-term reliability is your priority, choosing stainless steel flange materials such as T409 or 304 alloy ensures the replacement joint resists future road salt, splash brine, and high-heat oxidation.
Essential Preparation and Broken Stud Extraction
Exhaust hardware lives in one of the most hostile operating environments on any vehicle. Daily thermal cycling exceeding 700°F combined with exposure to water and winter road chemicals causes fasteners to rust and seize solid. Proper surface prep and careful fastener removal protect you from breaking hardware deep inside a manifold ear.
- Pre-Soak Fasteners: Apply a dedicated rust-penetrating fluid to all exposed threads and flange studs at least 12 to 24 hours before attempting removal. Reapply a second coat 30 minutes prior to turning a wrench.
- Clean to Bare Metal: Use a drill-mounted wire wheel, brass brush, or abrasive flap wheel to strip away flaking scale, carbon buildup, and old gasket remnants from the flange mating faces. The mating surface must be flat and clean to establish a reliable mechanical seal.
- Safety Gear: Always wear impact-rated safety glasses and heat-resistant gloves. Rusted exhaust scale flakes off easily during wire brushing.
- Hardware Upgrades: Discard original corroded fasteners. Always reassemble exhaust joints using high-strength Grade 8 steel or heat-treated stainless steel bolts paired with locking flange nuts.
Tackling Seized Flange Studs and Rusted Mounting Ears
If a rusted stud snaps flush with the flange ear or rounds off completely under torque, follow these proven extraction techniques:
- Thermal Expansion Extraction (Torch Technique): Heat the flange ear surrounding the broken stud with a propane, MAPP gas, or oxy-acetylene torch until the parent metal expands. While the surrounding metal is hot, touch a standard wax candle to the exposed threads. The paraffin wax melts, wicks deep into the microscopic thread gaps via capillary action, and acts as an extreme-temperature lubricant. Back the stud out using locking pliers or a stud extraction socket.
- Stud Extraction Sockets: For studs that retain a protruding shank, slip a cam-style or reverse-fluted stud extractor over the shaft. As you apply counterclockwise torque with a breaker bar, the internal teeth bite deeper into the stud to spin it free without slipping.
- Drilling and Tapping: If the stud shears off below the surface, center-punch the exact middle of the broken fastener. Drill a pilot hole with a 1/8″ cobalt drill bit, progressively step up drill sizes, and clean the original threads using the appropriate tap (such as an M10-1.50 tap).
- No-Drill Bracket Solutions: If drilling is impossible due to tight underbody clearances, specialized contoured bracket repair kits slip directly over the broken stud location and transfer clamping force through the existing converter mounting holes without requiring torch work or machining, as outlined in this step-by-step muffler pipe flange repair guide.
Step-by-Step Guide to Flange Repair and Sealing
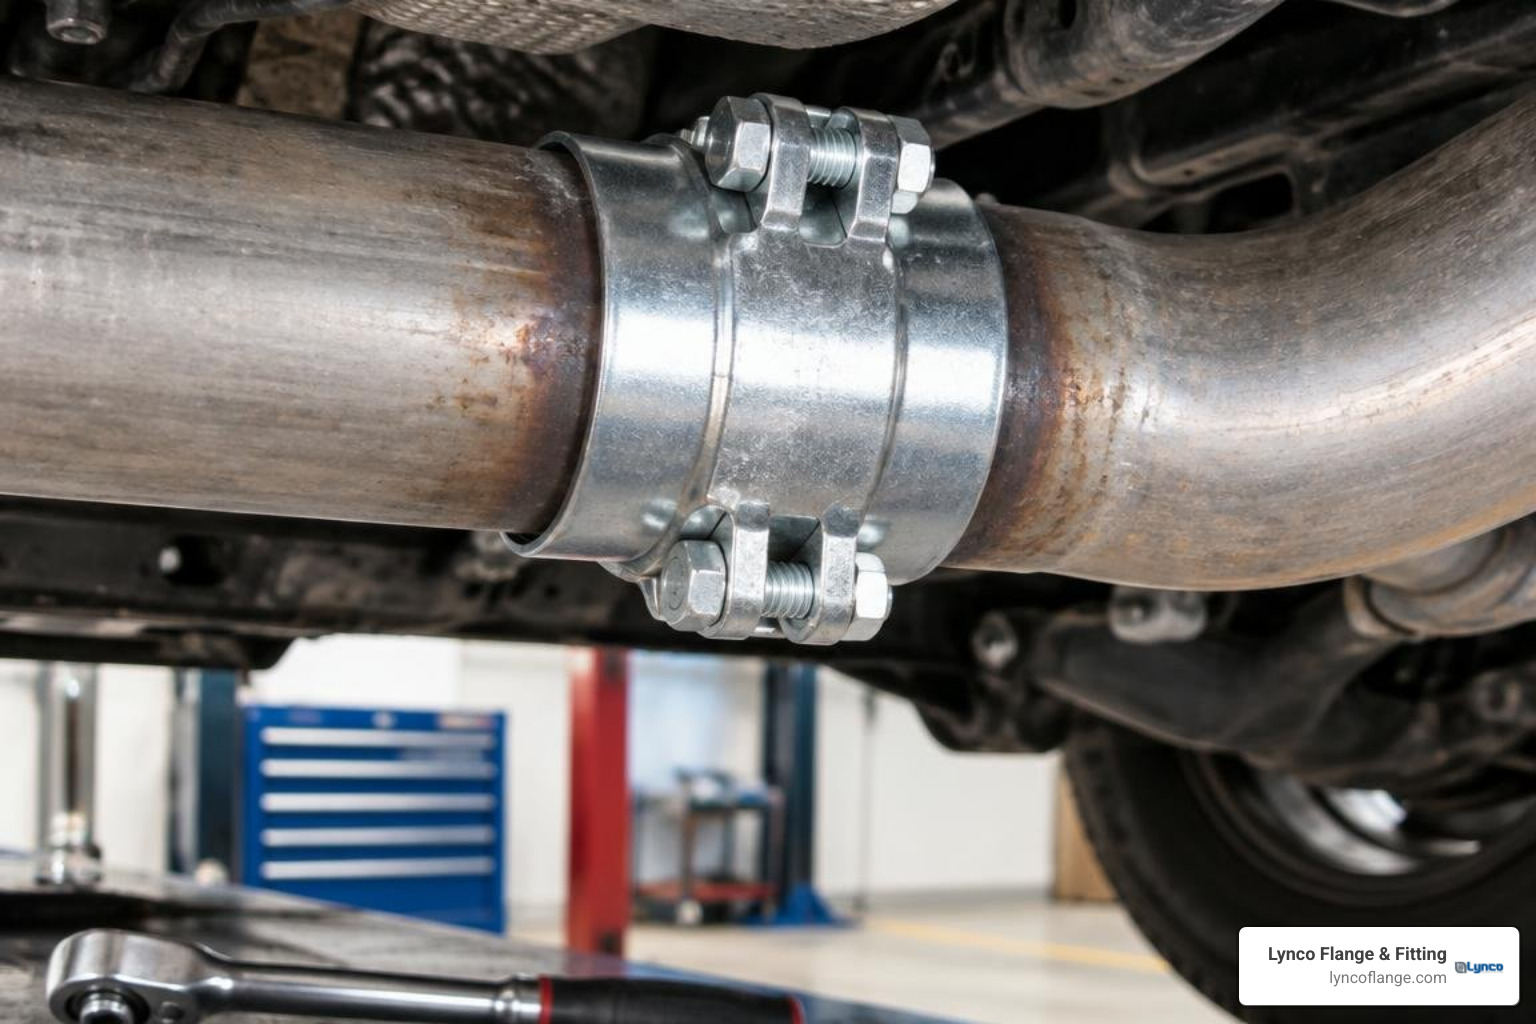
Achieving an airtight, durable exhaust seal requires high-temperature chemistry combined with uniform mechanical compression. In high-heat industrial pipeline connections and automotive exhaust systems alike, understanding how flanges perform in high-temperature environments helps you prevent common joint failures.
The Sandwich Seal Technique with High-Temp RTV
Flange faces that have suffered from rust pitting rarely seal with a dry gasket alone. The Sandwich Seal method compensates for surface irregularities:
- Select the Correct Sealant: Use an oxygen-sensor-safe, high-temperature RTV silicone or exhaust joint paste rated for continuous exposure of at least 700°F (371°C). Standard automotive silicone will burn away and leave open leak channels.
- Layer 1 (Base Coat): Lay a smooth, continuous 1/8-inch bead of high-temp RTV along the circumference of the cleaned primary flange face, encircling the inner exhaust bore and bolt pass-through holes.
- Layer 2 (Gasket Placement): Press a high-quality multi-layer steel (MLS) or wire-reinforced graphite gasket firmly onto the wet RTV bead.
- Layer 3 (Top Coat): Apply a matching 1/8-inch bead of high-temp RTV across the exposed top face of the gasket.
- Compression: Mate the opposing flange against the wet assembly. Tighten the fasteners finger-tight until the RTV bead begins to squeeze evenly past the outer perimeter, then stop and allow it to tack up before applying final torque.
Step-by-Step Installation of an Exhaust Pipe Repair Flange
Follow this sequential process to install a 2-bolt split repair flange:
- Position the Split Halves: Slide the two interlocking halves of the split flange over the exhaust pipe behind the existing flared lip or severed flange ring. Ensure the flat, machined side faces toward the mating connection.
- Align the Fasteners: Insert new Grade 8 or stainless steel bolts through the slotted flange ears. Install flat washers on both the bolt head and nut sides to distribute clamping loads evenly across the slotted holes.
- Torque Evenly in Increments: Tightening one side completely will cock the flange at an angle, warp the plate, and crush the gasket unevenly. Following proper flange torque techniques, alternate back and forth between both bolts in 5 to 10 ft-lb increments until reaching the recommended final torque specification (typically 25 to 35 ft-lbs for standard 3/8″ or M10 exhaust hardware).
- Allow Full Cure Time: Do not start the engine immediately. Allow the high-temperature RTV sealant to cure completely at room temperature for 2 to 24 hours (depending on specific product guidelines). Starting the engine too early allows exhaust pressure to blow liquid sealant out of the joint.
- Post-Installation Leak Check: Start the engine and listen for ticking or hissing noises. Re-inspect the joint with soapy water or a visual check for carbon tracking after the initial heat cycle.
Frequently Asked Questions About Exhaust Flange Repair
Can I use JB Weld or epoxy on an exhaust flange?
Standard two-part epoxies and regular JB Weld formulas should never be used on an exhaust flange. Standard epoxies break down at temperatures above 300°F to 500°F and quickly crumble under engine vibration and exhaust heat cycling.
Specialty high-heat paste formulas (such as JB Weld ExtremeHeat) can withstand temperatures up to 2,400°F and work well for filling small surface pits or sealing pinholes. However, chemical epoxies lack structural tensile strength and cannot replace a physical split flange or mechanical clamp when the mounting ears have rusted away.
How long does high-temperature exhaust sealant take to cure?
Most high-temperature RTV silicones and exhaust paste sealants require a minimum cure time of 2 to 24 hours before being exposed to exhaust heat and pressure.
RTV cures via room-temperature vulcanization, reacting with ambient moisture in the air. If you crank the engine immediately after installation, exhaust backpressure will blow the wet sealant out from between the flange faces, creating an immediate leak path that will never self-seal.
Why does my new exhaust gasket keep blowing out?
If replacement gaskets continue to burn through or blow out shortly after installation, the issue is almost always mechanical rather than a defect in the gasket itself:
- Warped Flange Surfaces: Years of extreme thermal cycling can warp flange plates. If the mating faces are not flat within a few thousandths of an inch, clamping force remains uneven.
- Uneven Clamping Torque: Torquing one bolt down fully before tightening the other pinches one side of the gasket while leaving the opposite side loose.
- Exhaust System Movement: Broken rubber exhaust hangers or failed engine mounts allow the heavy exhaust piping to flex excessively during acceleration, levering the flange joint open.
- Severely Corroded Flange Ears: Rusted, flexible flange ears bend outward when tightened rather than transferring compressive force onto the gasket face.
Conclusion
An exhaust leak does not have to mean paying hundreds of dollars for a completely new catalytic converter or welded pipe assembly. By diagnosing the breach accurately, measuring your tubing outside diameter, and installing a heavy-duty split-flange repair kit with Grade 8 hardware and the sandwich seal technique, you can eliminate loud exhaust rumbles and keep exhaust fumes out of the cabin.
For heavy-duty piping systems, industrial plants, and commercial infrastructure, joint integrity is just as critical. Lynco Flange & Fitting supplies high-strength forged steel flanges, weld fittings, and custom-engineered pipeline components designed to maintain zero-leak performance across demanding, high-pressure environments.