Understanding the Exhaust Pipe Flange Gasket and Its Core Purpose
An exhaust pipe flange gasket is a specialized, high-temperature mechanical seal positioned between two bolted mating flanges in an exhaust tract. Whether connecting the exhaust manifold to the downpipe, joining the catalytic converter to the mid-pipe, or linking intermediate pipes to the muffler, its primary role is to bridge micro-imperfections between metal surfaces and completely contain scorching, toxic combustion gases.
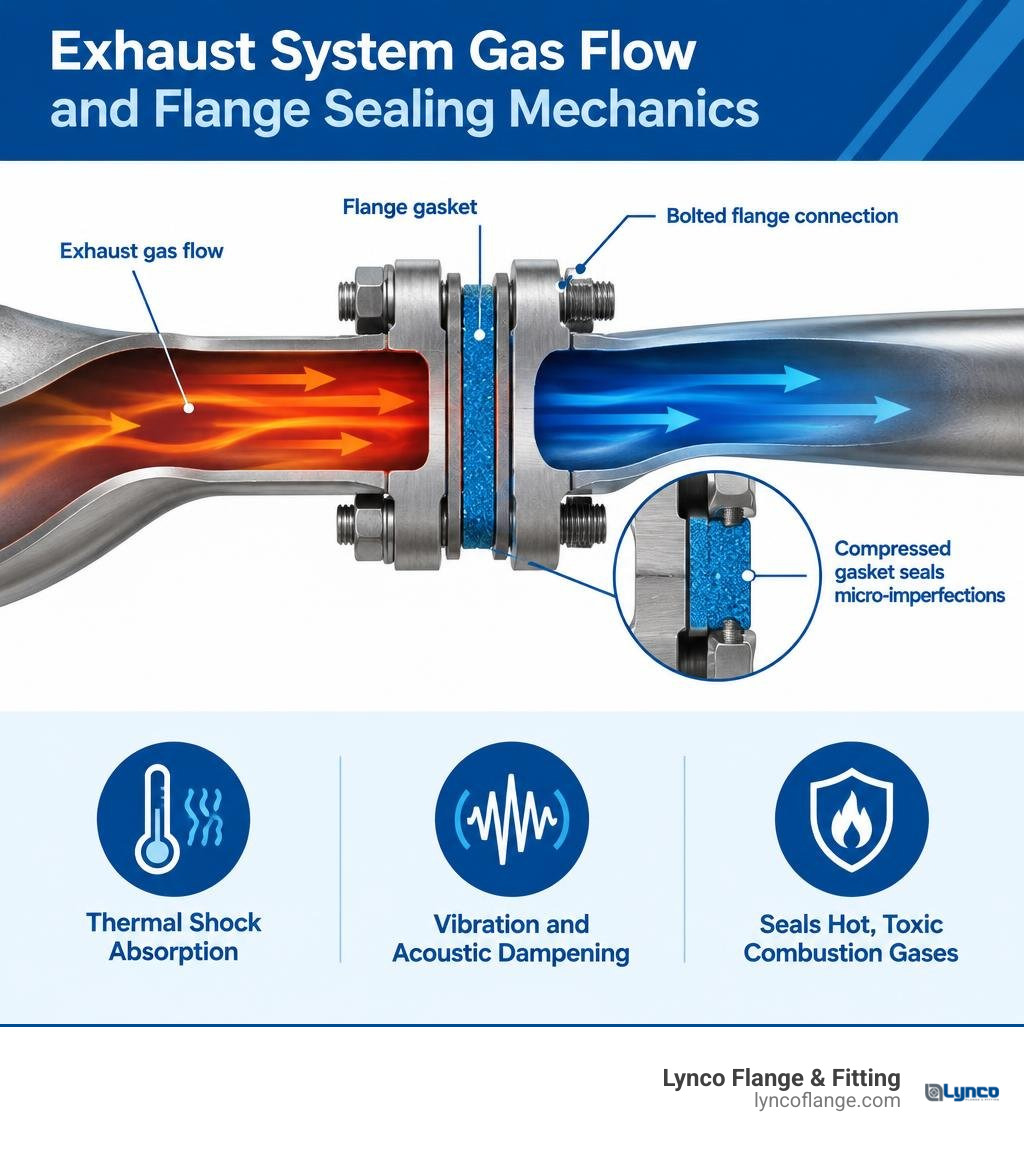
During normal engine operation, exhaust systems undergo extreme mechanical and environmental punishment. As exhaust pulses exit combustion chambers, localized gas temperatures can surge well past 1,200°F (650°C). This creates rapid thermal cycling—causing the exhaust pipes, manifold flanges, and fasteners to expand and contract at different rates. Without a resilient, compressible sealing barrier, these joints would quickly develop gaps.
Beyond gas containment, the gasket serves several interrelated functions:
- Thermal Shock Absorption: It accommodates differing rates of thermal expansion between cast iron, stainless steel, and mild steel components.
- Vibration and Acoustic Dampening: It cushions mechanical vibrations transmitted through the engine mounts and road surface, preventing annoying cabin drone and joint loosening.
- Emissions Containment: It ensures all raw hydrocarbons, carbon monoxide, and nitrogen oxides (NOx) are directed cleanly through the vehicle emissions system without venting beneath the passenger floorboards.
When joints are improperly aligned or torqued unevenly, sealing barriers degrade rapidly. Thermal fatigue, uneven bolt loads, and surface warpage remain the primary culprits across both automotive and heavy piping systems. The same principles that govern flange gasket selection in industrial piping apply to automotive exhaust joints, where material compatibility and surface preparation determine long-term sealing performance.
How Exhaust Pipe Flange Gasket Failure Impacts Engine Performance
A compromised exhaust seal does far more than create an unpleasant noise—it disrupts the finely tuned fluid dynamics of the powertrain. Modern internal combustion engines depend on calculated exhaust velocity and scavenging pulses to evacuate spent cylinder charges efficiently. A breach near the manifold-to-front-pipe connection allows exhaust gas to escape prematurely, causing an immediate drop in designed backpressure.
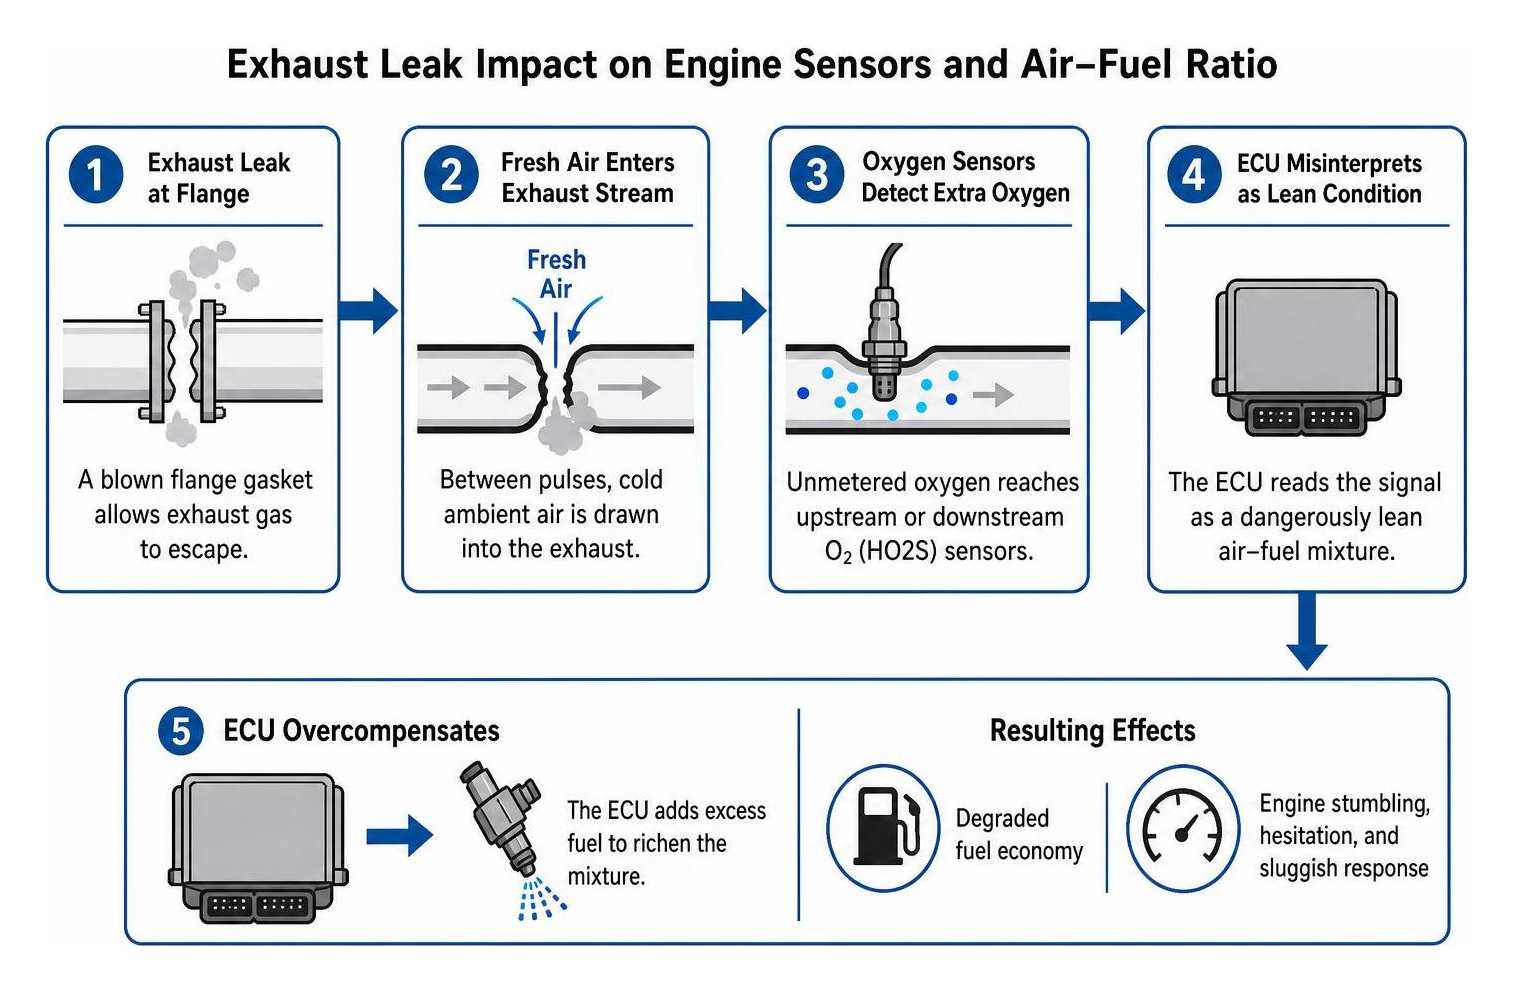
Worse still, exhaust tracts do not simply blow air out; high-velocity exhaust pulses create alternating positive and negative pressure waves. A blown flange gasket acts as a one-way siphoning leak, drawing cold ambient air (and unmetered oxygen) straight into the exhaust stream between exhaust pulses.
When this fresh oxygen reaches upstream or downstream Heated Oxygen Sensors (HO2S), the engine control unit (ECU) misinterprets the reading as a dangerously lean air-fuel condition. The ECU compensates by dumping excess fuel into the combustion chambers. This triggers:
- Noticeably degraded fuel economy (often dropping by 2–4 MPG).
- Engine stumbling, hesitation, and sluggish throttle response.
- Accelerated carbon buildup on spark plugs and valves.
- Catastrophic overheating of the catalytic converter core as unburnt fuel ignites within the exhaust pipe.
Diagnostic Signs and Trouble Codes of a Blown Seal
Identifying a compromised exhaust gasket early prevents secondary component failure. Because exhaust leaks change character depending on engine temperature, drivers can spot failure through distinct mechanical and sensory symptoms:
- Cold-Start Ticking or Hissing: A loud, sharp “tick-tick-tick” or rhythmic hissing sound that syncs with engine RPM. This noise is often loudest during a cold start and may quiet down slightly as the exhaust pipes heat up and expand against the leak path.
- Exhaust Odor in the Cabin: Dangerous carbon monoxide and raw combustion fumes entering the vehicle HVAC intake, especially when idling at traffic lights.
- Physical Soot Tracking: Visible black carbon powder or soot staining radiating outward around the perimeter of the bolted flange joint.
- Diagnostic Trouble Codes (DTCs): A glowing Check Engine Light accompanied by fault codes such as P0420 or P0430 (Catalyst System Efficiency Below Threshold). False catalytic converter efficiency codes frequently occur when ambient air leaks past a front flange gasket, artificially throwing off dual O2 sensor voltage differentials.
Addressing these symptoms early is critical. Structural deformation, bolt stretch, or corrosion can accelerate gasket burnout and lead to more extensive exhaust system damage.
Gasket Materials and High-Temperature Engineering
Exhaust gaskets must survive extreme thermal thresholds, chemical wash from unburnt fuel, and intense mechanical pressure. Selecting the appropriate construction material determines whether a joint lasts 100,000 miles or blows out within a few thermal cycles.
| Gasket Material | Max Temperature Rating | Compressibility | Surface Conformity | Best Application |
|---|---|---|---|---|
| Expanded Graphite Foil | 1,200°F – 1,800°F | Very High | Excellent | Header collectors, turbo downpipes, imperfect repair surfaces |
| Multi-Layer Steel (MLS) | 1,000°F – 1,400°F | Moderate | Low to Moderate | High-performance OEM flanges, precision-machined joints |
| Perforated Core Composite | 900°F – 1,200°F | High | High | General aftermarket repairs, mid-pipes, catalytic converters |
| Solid Copper / Soft Metal | 1,300°F – 1,600°F | Low | Moderate | High-heat racing headers, reusable specialty applications |
Perforated Metal, Fiber Cores, and Heat Containment
For real-world automotive repair environments where flange faces are rarely factory-flat, perforated metal composite gaskets provide the most dependable balance of flexibility and strength.
These gaskets feature an internal carbon steel or stainless steel core stamped with hundreds of microscopic directional prongs. High-density, heat-resistant fiber composites or expanded graphite layers are mechanically bonded into both sides of the core.
To prevent the core materials from eroding under the continuous sandblasting effect of high-velocity exhaust gases, premium designs incorporate an integrated internal fire ring (a solid steel armor grommet lining the inner port circumference). The fire ring deflects direct flame fronts, prevents blowout under high exhaust backpressure, and maintains joint rigidity across thousands of thermal cycles.
Measuring an Exhaust Pipe Flange Gasket for Custom or OEM Piping
Whether ordering a standard replacement or fabricating custom performance exhaust piping, measuring your flange joint accurately ensures a leak-free seal.
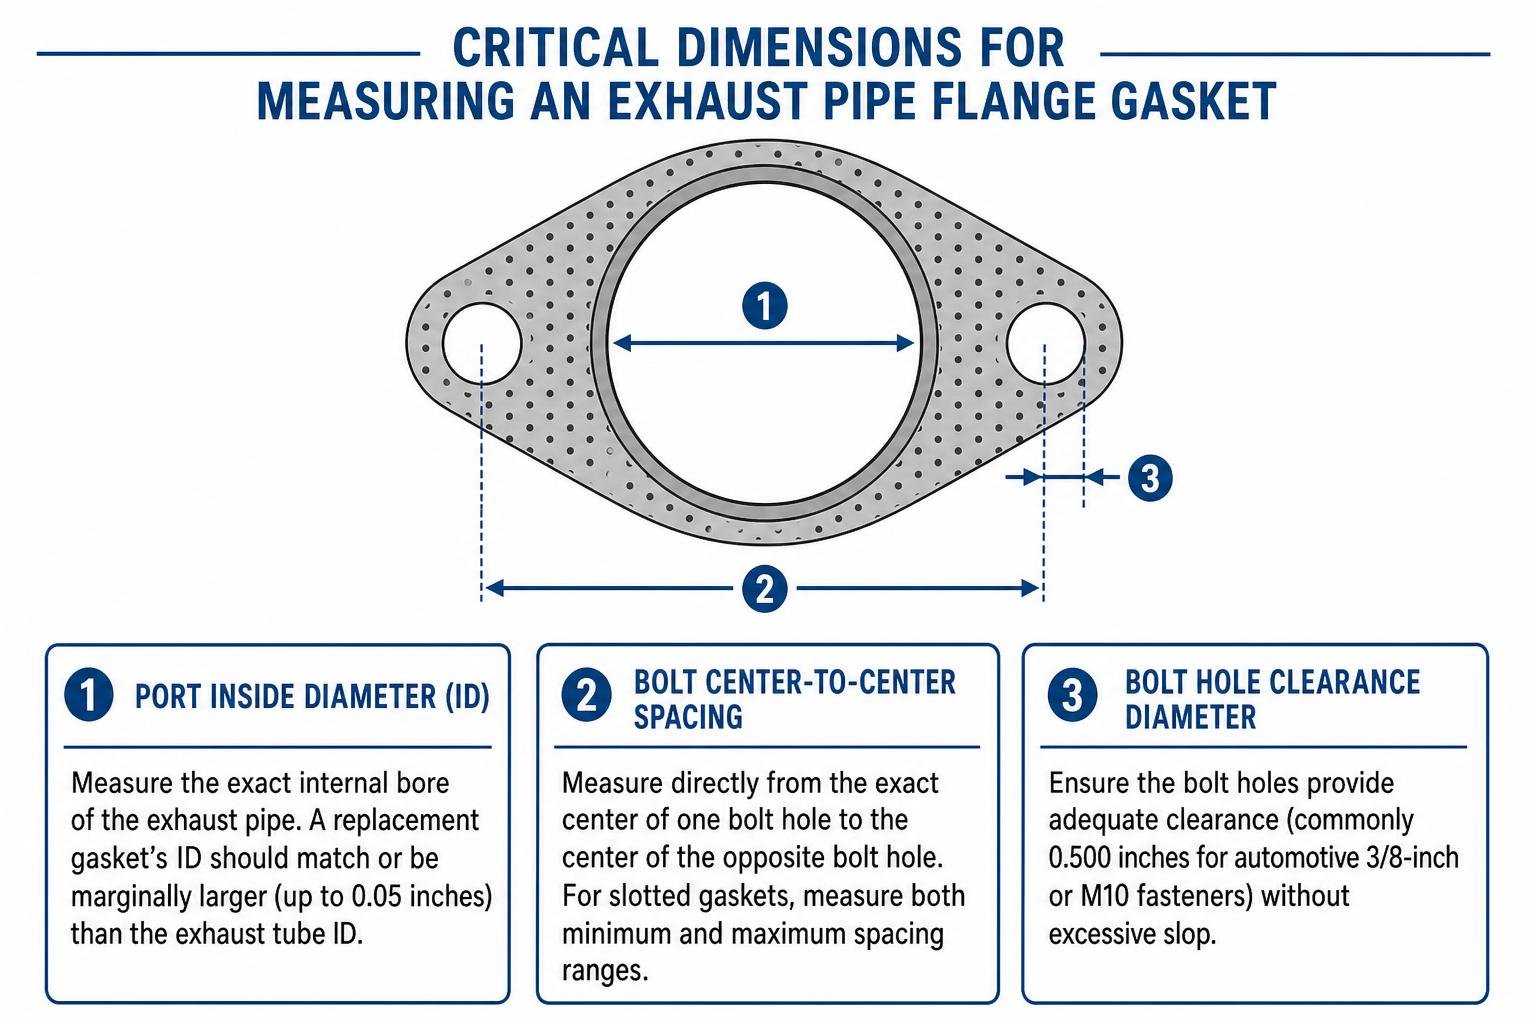
To size an exhaust gasket accurately, measure the following key dimensions using a digital vernier caliper:
- Port Inside Diameter (ID): Measure the exact internal bore of the exhaust pipe. A replacement gasket’s ID should match or be marginally larger (up to 0.05 inches) than the exhaust tube ID. A gasket that protrudes into the flow path creates localized turbulence, excessive backpressure, and premature edge erosion.
- Bolt Center-to-Center Spacing: Measure directly from the exact center of one bolt hole to the center of the opposite bolt hole. For slotted gaskets, measure both minimum and maximum spacing ranges.
- Bolt Hole Clearance Diameter: Ensure the bolt holes provide adequate clearance (commonly 0.500 inches for automotive 3/8-inch or M10 fasteners) without excessive slop.
- Flange Shape and Overall Dimensions: Identify whether your setup requires a 2-bolt oval, 3-bolt triangular, or 4-bolt square pattern.
In industrial, marine, and extreme-service exhaust installations where fluid dynamics and joint loads mimic critical piping systems, selecting a high-pressure flange gasket that aligns with all structural parameters ensures reliable performance under continuous service. For additional reference on gasket material selection and thermal performance, the Engineering ToolBox provides comparative data on common sealing materials.
Step-by-Step Selection and Installation Protocol
Even premium exhaust gaskets will fail rapidly if installed over contaminated surfaces or clamped with uneven torque. Following an orderly replacement sequence ensures a reliable, permanent seal.

Required Tools and Supplies
- Set of 3/8″ drive sockets, deep sockets, and matching ratchet
- Calibrated foot-pound or inch-pound torque wrench
- Stiff wire brush and brass gasket scraper
- High-temperature penetrating oil (e.g., PB Blaster or Kroil)
- Copper-based anti-seize lubricant (rated to 1,800°F)
- Replacement Grade 8 / Class 10.9 exhaust hardware (bolts, studs, and locking nuts)
- Personal protective equipment (safety goggles, heat-resistant gloves, dust mask)

Step 1: Pre-Soak Fasteners and Disassemble
Exhaust hardware is exposed to road salt, moisture, and intense thermal oxidation. Spray all flange nuts and studs generously with high-temperature penetrating oil several hours before disassembly. If fasteners remain seized, heat the nut with a propane torch to induce thermal expansion before backing it off with a steady, continuous pulling force to avoid snapping the stud.
Step 2: Thorough Surface Preparation
Scrape away all remnants of the old, baked-on gasket using a brass scraper. Clean both mating flange faces down to bare, uniform metal using a stiff wire brush. Inspect the flange face for deep radial grooves, severe rust pitting, or thermal warpage using a precision straightedge and feeler gauge. If flange distortion exceeds 0.008 inches across the face, resurface the flange or use a thick, high-conformity expanded graphite composite gasket engineered for imperfect repair surfaces.
Step 3: Fastener Hardware and Anti-Seize Application
Never reuse corroded or heat-stretched exhaust fasteners. Install new Grade 8 or Class 10.9 hardware. Apply a light coating of copper anti-seize lubricant directly to the bolt threads, keeping the lubricant clear of the gasket face. Anti-seize prevents thread galling and ensures accurate torque translation.
Step 4: Gasket Alignment and Progressive Torquing
Position the new exhaust pipe flange gasket squarely over the exhaust port, ensuring slotted holes or alignment tabs sit flush without binding against bolt threads. Thread the hardware on finger-tight.
Tighten the fasteners incrementally in 30%, 60%, and 100% torque increments using a calibrated torque wrench. On 2-bolt flanges, alternate between the two bolts progressively to keep the flange faces completely parallel. For 3-bolt and 4-bolt patterns, follow a crisscross star pattern. Applying proper flange torquing techniques helps prevent warped ears and uneven gasket crush.
Popular Automotive Flange Gasket Fitment Cross-Reference
Selecting a replacement gasket is streamlined by cross-referencing reliable aftermarket part numbers with proven real-world vehicle applications:
- Part Number 61338: A versatile, high-temperature composite flange gasket engineered to fit over 582 vehicle models across 4 major makes, including popular platforms such as the Honda Civic, Acura TL, Acura TSX, and various Nissan/INFINITI sedans.
- Part Number 60578: Designed specifically for high-volume import applications, this part provides coverage for 739 vehicles across 3 makes, including decades of Honda Accord, Civic, and Civic Del Sol models.
- Part Number 61710: A heavy-duty, round-port manifold-to-front-pipe gasket (featuring a 3.170-inch inner diameter) compatible with over 80 vehicle models spanning model years 2009 through 2022, including Chrysler 300, Dodge Charger, Challenger, Jeep Grand Cherokee, and Ram 1500 trucks.
- Part Number WAL-31388: A perforated metal composite gasket with an integrated fire ring, 0.500-inch bolt holes, and a 0.058-inch thickness that fits over 50 vehicle models across 15 makes, ranging from Chevrolet and Ford to Subaru, Mazda, and Hyundai.
- Part Number FEL-23591: An OE-grade exhaust gasket with a 1.972-inch port inside diameter and 2.546-inch outside diameter supporting over 50 classic and modern models from 1975 to 2022, spanning Toyota, Lexus, Scion, Chevrolet, and Lotus.
- Part Number 60902: A specialized performance exhaust gasket engineered to handle high turbo backpressure on the Subaru WRX (2015–2021), WRX STI (2013–2021), and Subaru Outback (2013–2014).
Frequently Asked Questions About Exhaust Sealing Systems
Can an exhaust flange seal be reused after disassembly?
No, an exhaust pipe flange gasket should never be reused. Exhaust gaskets are single-use, sacrificial components designed to undergo permanent plastic deformation when clamped. During initial installation, internal fire rings collapse and composite fibers compress to conform to the unique microscopic peaks and valleys of that specific joint.
Once unbolted, the material suffers from “compression set” and will not spring back to its original thickness. Reinstalling a compressed, heat-hardened gasket almost always results in immediate exhaust leaks, burned material edges, and diagnostic fault codes.
What is the typical cost range for replacement gaskets and hardware?
Replacement automotive exhaust flange gaskets are inexpensive, typically ranging from $4.00 to $18.00 for the bare gasket, depending on material composition and port dimensions. Complete hardware replacement kits (including high-temperature Grade 8 studs, self-locking flange nuts, and compression springs) generally cost between $10.00 and $25.00.
If you hire a professional automotive technician, total repair costs typically range from $120.00 to $250.00, with labor accounting for most of the bill due to the time required to extract rusted, heat-seized fasteners safely.
Which industrial connection standards correlate with heavy-duty exhaust systems?
In commercial power generation, heavy diesel transport, marine propulsion, and industrial energy piping, exhaust connections follow formal industrial piping standards rather than light automotive pressings.
Most heavy-duty and marine exhaust tracts utilize ASME B16.5 Class 150 or Class 300 piping flanges. These configurations rely on heavy forged weld-neck or slip-on styles with raised faces (RF) to handle extreme thermal expansion and mechanical vibration. Understanding the most common industrial flange types and classifications provides direct insight into how heavy-duty flanged systems manage thermal and pressure stresses at scale.
Conclusion
A durable, leak-free exhaust system relies on more than just high clamping force. Achieving long-term sealing integrity requires choosing a gasket material matched to your operating temperatures, verifying port and bolt dimensions, thoroughly cleaning mating surfaces, and applying balanced, incremental torque to new hardware.
At Lynco Flange & Fitting, we understand the engineering challenges of managing thermal expansion, dynamic mechanical loads, and fluid containment. Based in Houston, Texas, our engineering-driven team delivers ISO-compliant forged steel flanges, custom pipe fittings, and technical sealing guidance across the energy, power generation, marine, and construction sectors. Whether tackling an automotive exhaust overhaul or designing critical heavy piping systems, explore our complete catalog of industrial flange solutions and custom high-pressure engineering to build joints that stand up to the toughest operating environments.